
You might have seen this already on the Love Your Clothes blog, as they have asked me to be a guest blogger this month, but in case you haven’t, here is the story.
We all have items in our wardrobe that we have literally loved to death and are now ready for the charity shop or for recycling. But somehow, you just can’t part with them, because of sentimental reasons or maybe you just feel there is still something that can be done with them.
This is exactly how I felt about this old cardigan, that was a hand me down (or a swap in modern terms) from my good friend in Romania a few years ago. And I loved it and wore it on heavy rotation for some years until age and machine washing took their toll, and I ended up with a wonky contraption that, try as I might, was not wearable anymore. There is a lesson in there somewhere about how to treat woollens properly, but that is one for another day.
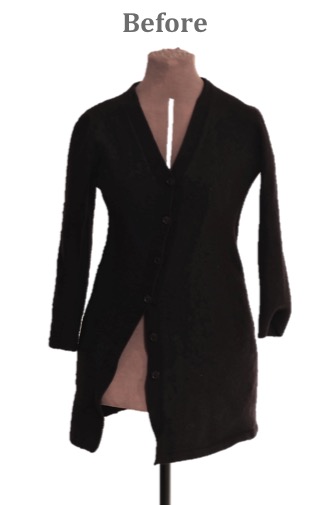
The cardigan was in my charity shop pile, as I know that old wool items can get recycled into new cloth, but I felt sorry to part with it. So I kept thinking about how I could remove the issues and turn it into something that I can wear again.
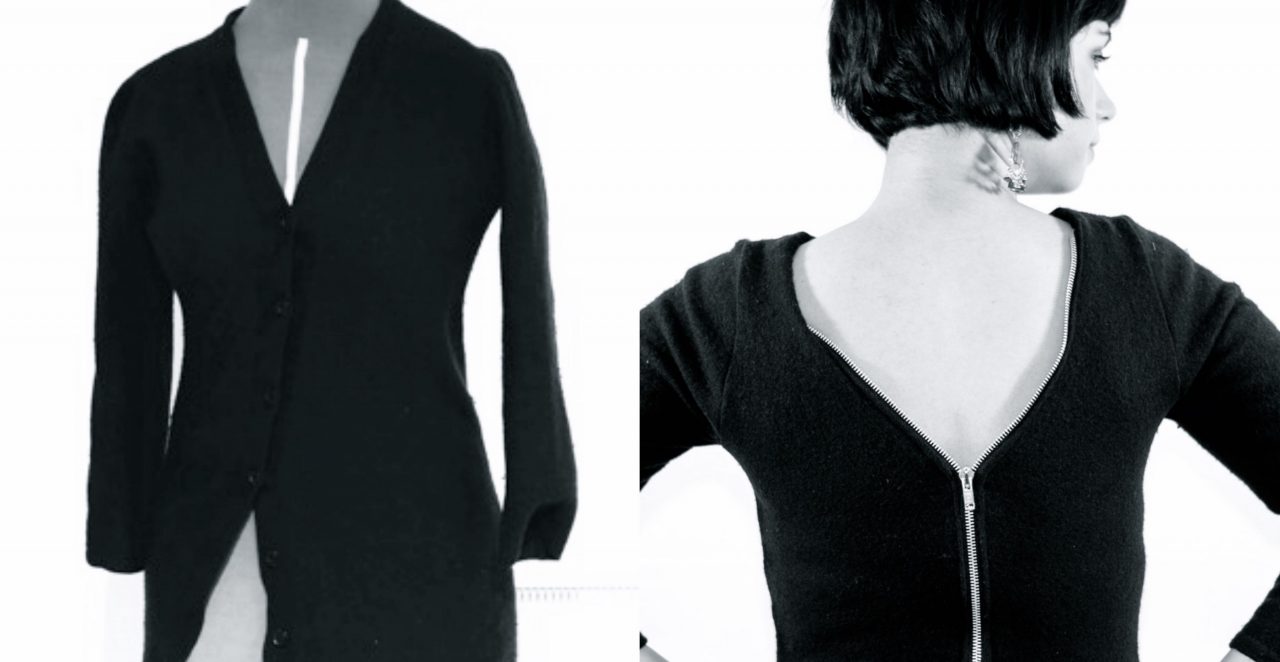
The biggest problem was the wonky centre front, the buttons were going all over the place, so that was the first issue to tackle. So my idea was to use the back as a front and cut the lower part until it got rid of the wonkiness. I had a large stash of metallic zips that I could dig into, to make it a bit more interesting.
My plan was to cut the cardigan up into the component parts and use a basic pattern to ensure the neckline and armholes were as they should be. You can, of course, free-hand, but I just wanted to get the shapes right.
So this is what it looked like once taken apart. You can see that even the cutouts are wonky!!
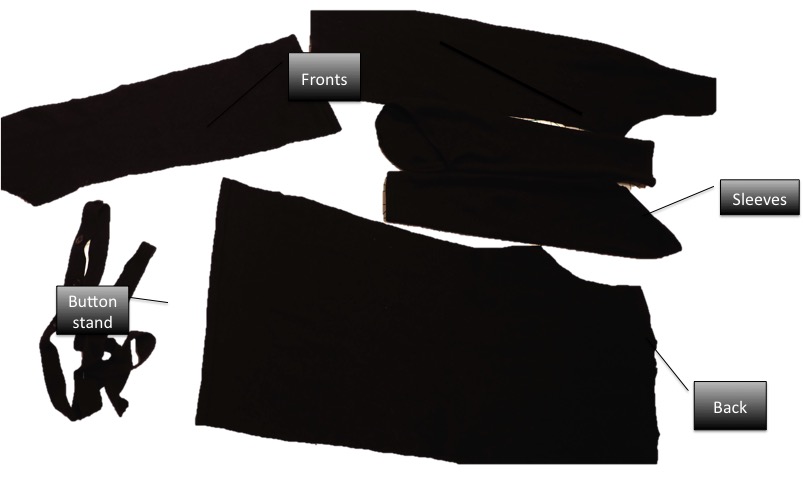
I used the back of the cardigan for the front of the jumper, making a boat neckline and shaping the armholes as for the front bodice (as opposed to the back bodice they were before).
I then reshaped the armholes of the front sides of the cardigan to accommodate the back of the sleeve.
I then joined the shoulders (with the overlocker), then the side seams, ready for the sleeve insertion. I did not modify the original sleeves at all, and they went in perfectly without any adjustments.
I now had the main part of the jumper constructed, so I was ready to insert the zipper. None of my zippers were short or long enough to insert normally, from the mid-centre back downwards, so I used a longer zip and sewed it all the way up to the shoulder seams instead.
To make sure the wool will not stretch when sewing in the zipper, I used stay tape (in this case nylon tape, but you can use twill as well). I then put in the zipper as per usual and then topstitched the edges for a more professional look. 
To finish the neckline, I used part of the button stand as bias tape and added it all around, from one end of the zipper to the other, along the front neckline.
Last bit was to overlock, turn and topstitch the hem.

I am very happy with the outcome and I have already wore it a few times since I finished it. The only thing I would change is maybe making a facing, as the zipper gets quite cold on my back if I’m not wearing a camisole.
Before I go, I want to share yet another amazing discovery with you all: the bobble comb!! It was only £1.95 on Amazon and it’s literally worth its weight in gold. It completely removed all the bobbles from this old jumper, and it also works on jersey, crepe, you name it. It does take a bit of elbow grease, but it really really works. The jumper was really good as new.
————- DON’T MISS A SINGLE POST —————


A really brilliant makeover, really thinking outside the box, well done. Hope your teaching goes well. Maureen
Author
Thank you! It has minor issues, but I love it. I actually made at the beginning of the month and it completely eradicated my sewing slump. I’ve been sewing like mad since, so double win!
So cool! What a great idea! There’s a pile of clothes in my bedroom waiting to be donated, I might see if there’s something in it that I can use to alter like you did. 🙂
great work! I love the zipper in the back 🙂
Wow what can I say, I love it! Really creative!
What a fabulous refashion and it will be something that you wear a lot and look totally cool. Well done!
I love how you took the zipper all the way to the shoulders. Super original touch.
Author
Thank you, Alison! I’m so happy with how it came out. Though the metal zip is a bit cold in the winter 😀.
You look amazing Alex. You are so elegant and stylish! Looks fab! Xx
Author
Oh, thank you Amanda! That’s so kind!!
I still want those high waisted trousers!
Author
This is my mission for April: make as many trousers as I can.