

When I first saw Mimi G wearing Sew Sew Def Katie dress, I was immediately in love! And I knew I must make one right away. Then came the perfect excuse too: the #SewTogetherforSummer Instagram Challenge that Sarah (from Sew Sarah Smith), Monika (@rocco.sienna) and Suzy (@sewing_in_spain) have hosted earlier in the summer. I did finish it like Cinderella by the stroke of midnight on the 21st June to take part in the challenge and wore it the very next day for my birthday. But what do you know? Yet another project that I made ages ago and did not get a chance to photograph.
Why, you might ask? Well, because this dress is blinkin’ cursed! Allow me to elaborate…
I was looking for a shirtdress pattern for the Challenge. I wanted something a bit different from the usual suspects (McCall’s 6696, I’m looking at you!). And in strolls Mimi with that super cute pattern that ticked all my boxes.
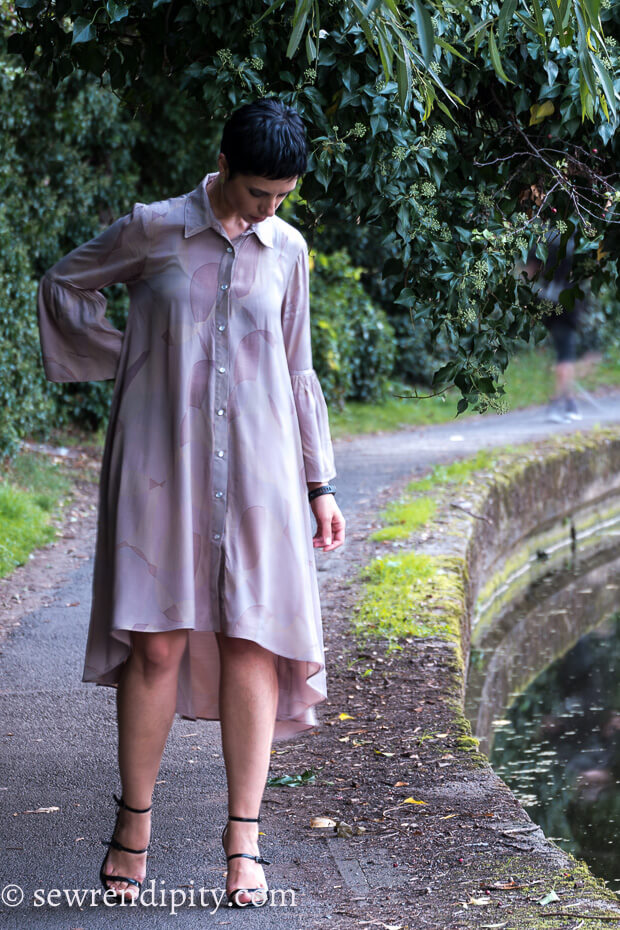
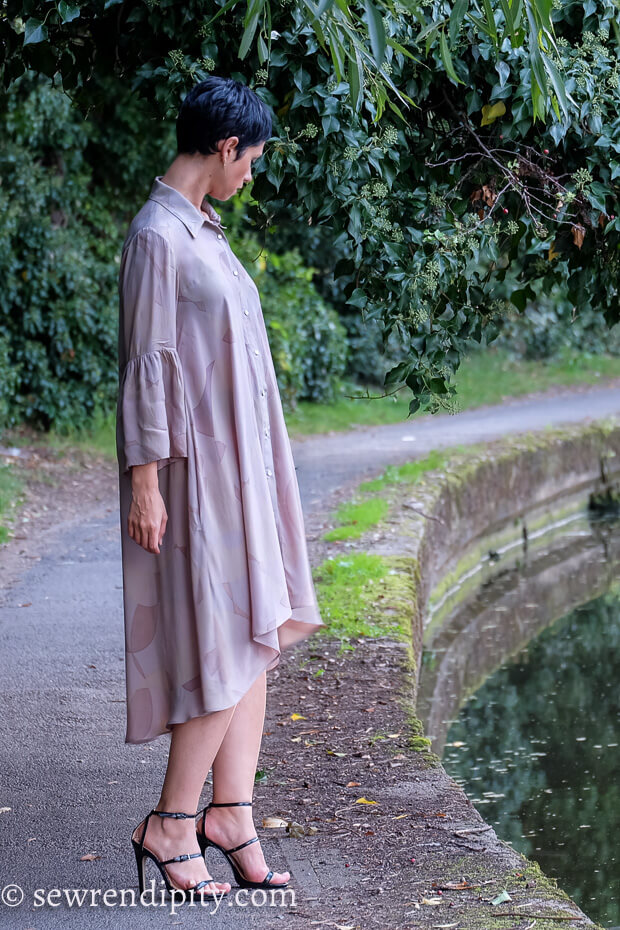
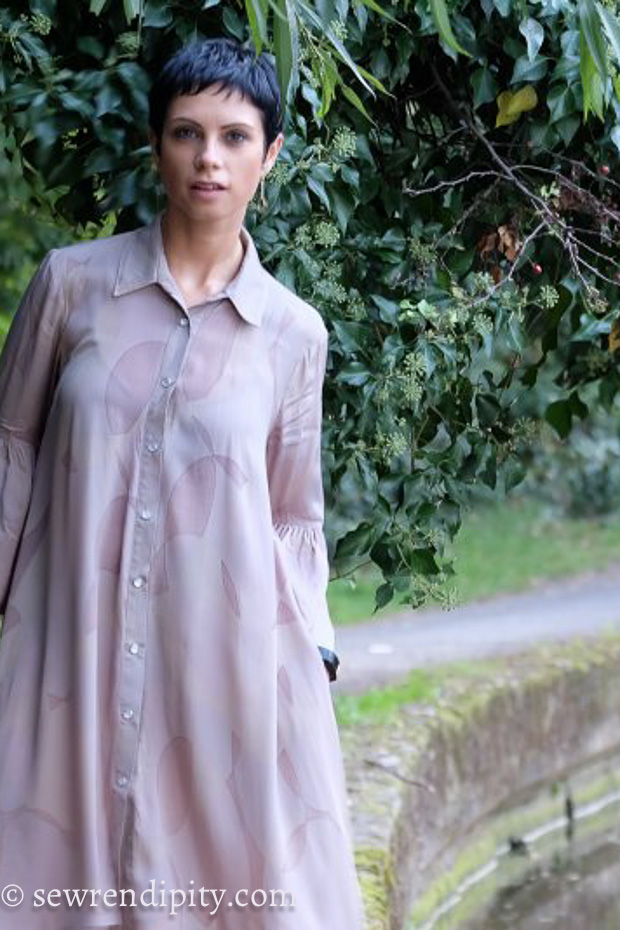
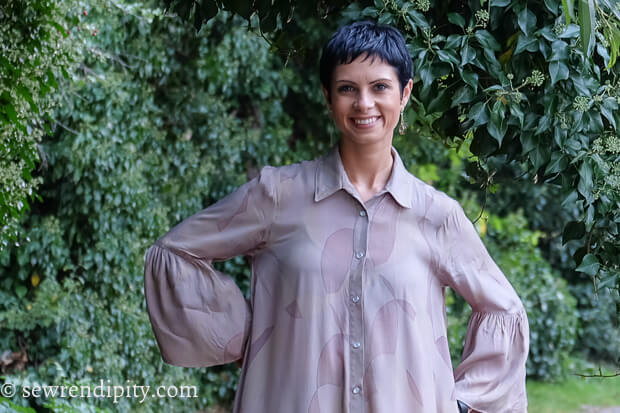
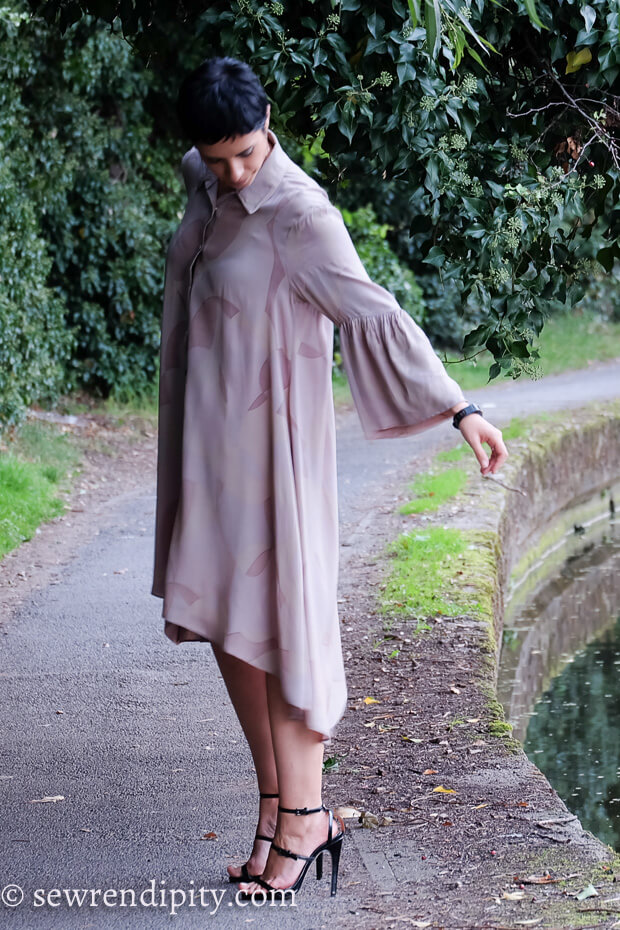
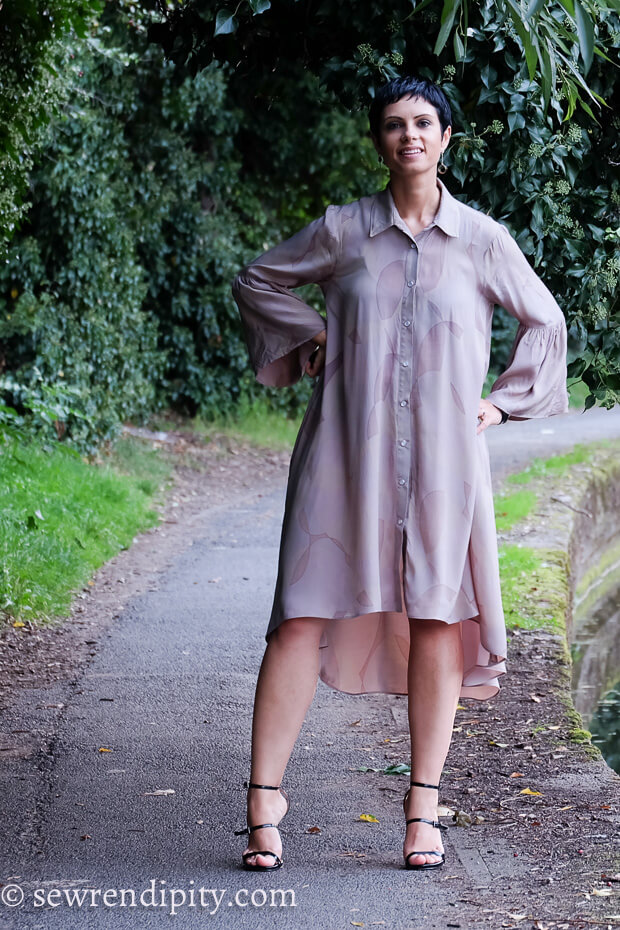
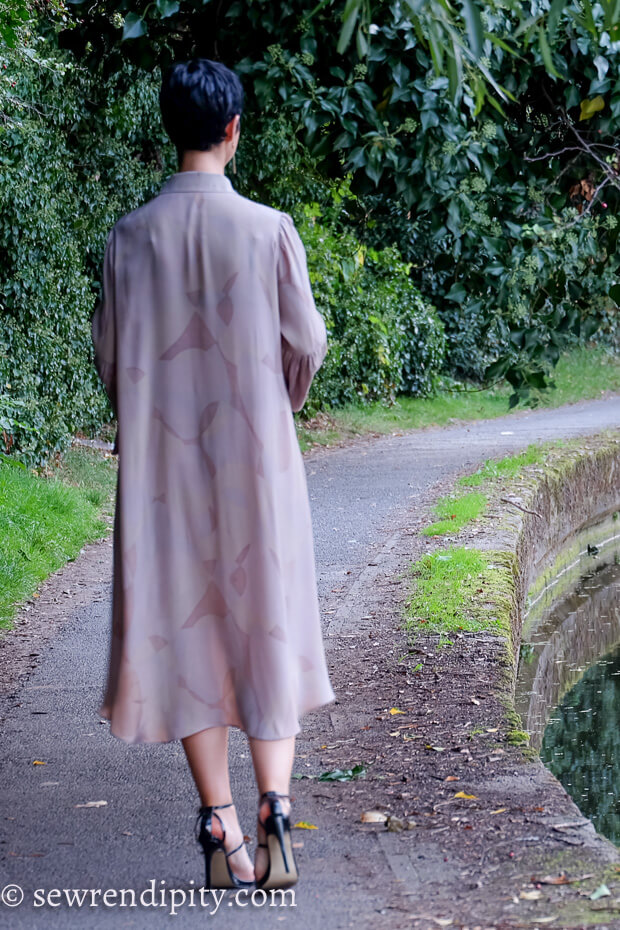
High-low hem? Check!
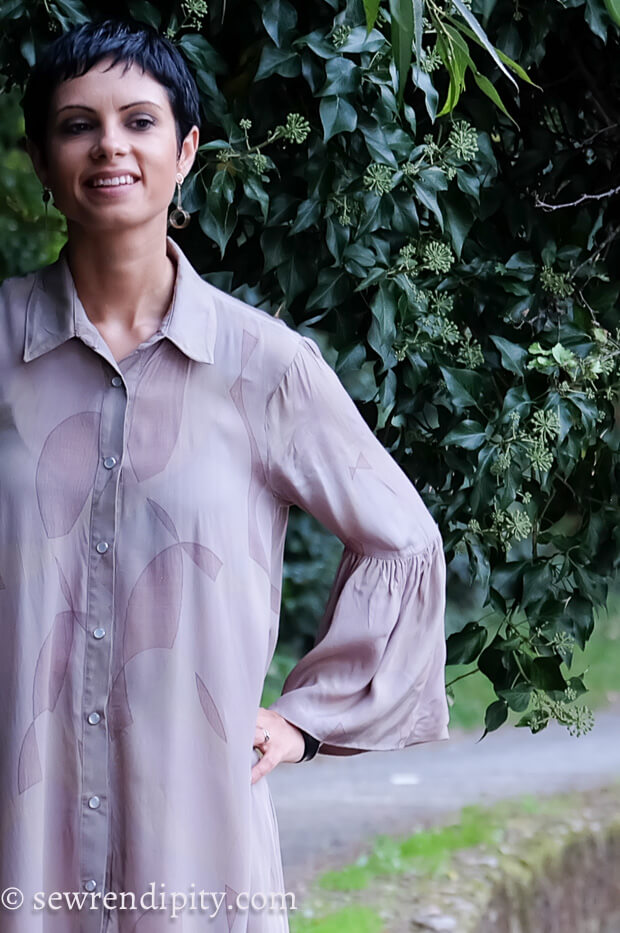
Awesome bell sleeves? Check!
Button down to keep with the competition rules? Check!
Pockets? Check!
What else can I say ? *heart eyes*.
The good part…
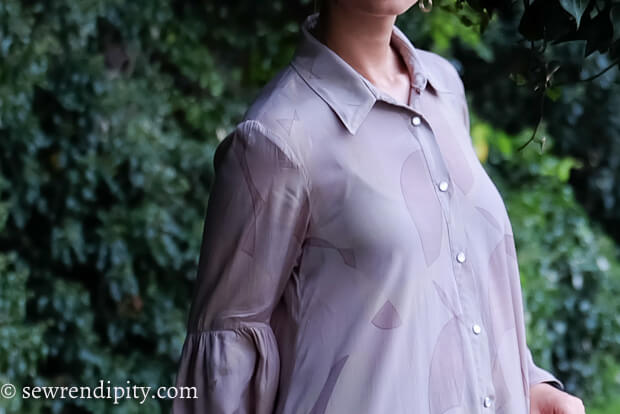
I had some fabric in my stash that I had been wondering about for ages that fitted the bill perfectly! It’s a fabric I got given ages ago, a friend got it in an Abakhan bargain bundle, but I always liked the drape and how silky it feels. It came out looking a bit taupe in these pics, but it’s definitely more grey. And I know that because I dyed it myself with Dylon machine dye and that’s what it said on the box, ha ha. The fabric was a sort of pale yellow to begin with, which I dies light green – it came out horribly, so I had to make it grey instead. It’s a sort of viscose, I would guess, as it took the colour fairly well, especially on the light parts. This worked out great, because the original print still comes through and created some sort of abstract design. The only downside is that it crinkles like the dickens so I do apologise in advance for the state of the sleeves in these pics. By the time I’ve ironed the rest, I can start all over again on the sleeves, and then go back to the body etc.
Btw, in case you are wondering, this pattern comes free with the June issue of Mimi G’s new sewing magazine, Sew Sew Def. You can also purchase the pattern on its own, but it’s a bit more expensive than getting the magazine.
I usually don’t mind assembling PDFs at all, but this one came together really easy, in spite of the hefty number of pages (45). I found the markings telling you where to join the pages very helpful and I put it together in no time. It also comes in copy shop version if you have one nearby.
The pattern comes in size from XXS to 2XL, but it’s quite generous over the hip areas. I cut a size M and gradedto L over the hips, but it wasn’t necessary, so I ended up cutting it back down to an S, there is enough ease to cover you even if you are pear shaped as I am. However, I would say the bust measurements are really important, it’s quite snug in that area.
It was a really easy sew, and the instructions were well illustrated and easy to follow. I overlocked all raw edges separately before starting the construction and ironed open. Be aware the seam allowance is 1 cm (3/8”). This is also mentioned in the instructions, but just in case you want to increase it in the cutting out phase.
The pattern was really well drafted and all the notches matched. The only small complaint was that the pocket placement felt a bit low to me, so I would move them up a bit next time.
To note that the bell sleeves are made by folding a piece of fabric in half, so they are actually doubled. This is not very obvious in the line drawings, but you will definitely notice that the pattern pieces are huge!
As I was pushing hard to finish the dress before the challenge deadline, I was running out of time to make buttonholes, so I decided to cheat a bit and use snap buttons that I has in my stash instead. But I only had 6, so I put them on as far down as they went, took the pics for the challenge in the nick of time and planned to order some more.
The crazy part…
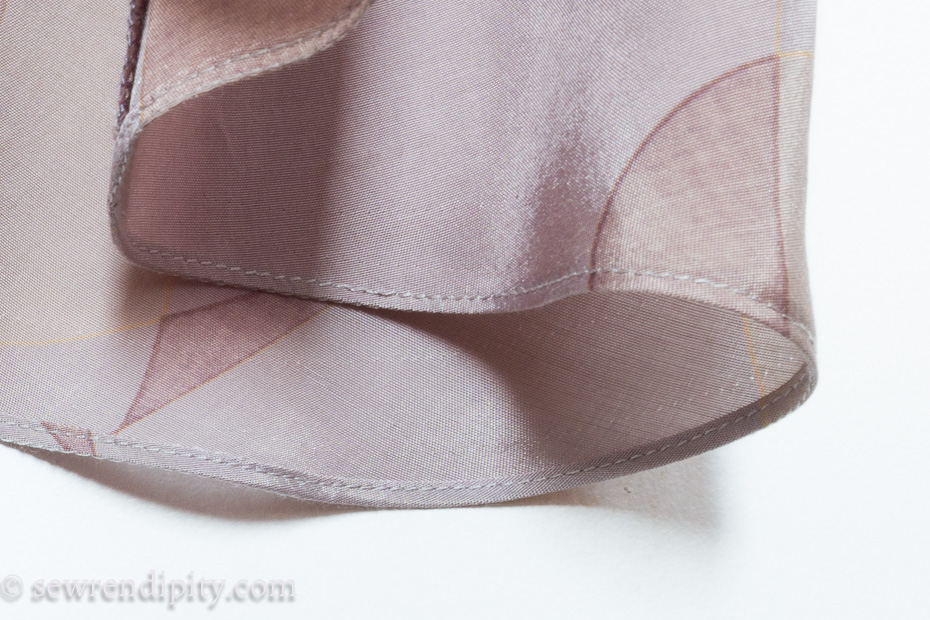
So all sounding super simple up to here, right? Well, this is where it got sour. The facing!! I really really struggled to get it to go in. The fabric is really drapey and it stretched a bit, but the difference between the hem and the facing was huge and I just could not top stitch it in place. So after a few tried, I decided to take it off (hem finishing attempt no. 1).
I then turned the facing into bias binding, as I did not have any more fabric left and sewed it on. It looked fairly good and I finished the dress (hem finishing attempt no. 2).
I wore it out the next day for my birthday and absolutely fell in love with how it felt on my skin, like silk, so cool (literally and figuratively) and swishy. I was showing a bit too much leg because of the lack of snaps going all the way down, but I was careful not to flash too many innocent bystanders. Of course, it was impossible to wear it to work like that, but I was waiting for the missing snaps to take it out again, as I loved it so much!
I had ordered the snaps off eBay as soon as I realised I didn’t have enough. And I waited. And waited. And waited. More than a week passed, with my lovely dress hanging in my sewing room and nothing. I went back to eBay to check and realised that the vendor was on holiday for 10 days and I had not realised that when I placed the order. Grrrr!
Anyway, they finally arrive, I install the missing snaps, iron the dress and get ready to wear it the next day for work. The summer was still hanging on and I really wanted to take advantage. So I put it on in the morning, yet again revelling in how lovely the fabric felt on my skin. Then I put on my perfume and realise in a panic that it had stained the fabric!!! So it had to go right in the wash!!
After yet another few days where there was enough of a similar colour load to wash it with, it finally gets out of the washing machine and shock horror, it was in shreds! Ok, I’m exaggerating a bit. The bias binding had come off in many places as did the placket. Grrrr again! I fixed the placket though it was a pain, but the bias was totally compromised. I had to take it off and figure out another solution, as I did not have enough fabric to make self-bias again. I had a brainwave to use silver binding, so I ordered some. It arrived after a few more days, but it was a bit stiffer than I had expected. I sewed it on, but it did not feel or look right. So off it came (hem finishing attempt no. 3).
What to use instead? I have some really nice poly cotton bias tape from Jaycotts that is much softer and drapier than regular cotton binding. So I ordered some light grey one from them. After yet more days, it arrived, but it really wasn’t the right colour. I did sew it on but took it right off (hem finishing attempt no. 4).
As you might imagine, I was at this point wondering if I will ever get to wear this dress before the summer was over!! And I was close to pulling my hair off! But I had yet another brainwave and decided to sew a tiny narrow hem that would look nice from the inside and outside (it would be visible from the inside because of the high-low hem). And that’s what we ended up with and finally, the dress was ready to go at hem finishing attempt no. 5!!!
I ironed it and it’s been hanging in my sewing room since the end of July, as I was waiting for a chance to photograph it and didn’t want anything to happen to it before I got a chance to blog it. Given all the palava above, can you blame me?!?
So, here we are, I finally managed to take some pics. I really didn’t want to use the grey background on my balcony, so last Friday I came home from work really determined to sort this out and take pics in the outside world! Unfortunately, my husband had to work late, so I was on my own. I went looking for locations and tried my best to take some pics while fending off cyclists and pedestrians on the towpath of the Grand Union canal near my house. Suffice to say I still have loads to learn about taking self-pics with the remote and tripod. But I hope you get the idea!
As an aside, if you have a Fujifilm camera (like I do), I really recommend the Fuji X Forum. I got totally exasperated with the quality of my pics and posted a question on how to get this better next time, and I was overwhelmed with the response. Really helpful and knowledgeable.
Details recap:
Pattern: Sew Sew Def Magazine, June 2017 (Issues 3), size M
Pattern description: high-low shirt dress with 2 piece shirt collar, gathered bell sleeves and side seam inset pockets.
Fabric: Viscose from Abakhan dyed grey
Notions: Pearl snap buttons from Prym (8); fusible interfacing for collar and button stand
Alterations: No fit alterations; replaced hem facing with a narrow hem
Future alterations: Move pockets 1” higher.
Make again: Absolutely! I would love to make it in something a bit warmer for autumn.

Anyway, I am finally free to wear the dress to work and I do hope nothing else will happen to it, so I can get some joy out of it before the weather goes cold!!
HAVE YOU HAD ANY SUCH PROJECTS THAT FELT A BIT CURSED? HOW LONG DID IT TAKE YOU TO FINALLY GET THEM PHOTOGRAPHED OR WORN? TELL ME IN THE COMMENTS OR TWEET ME @SEWRENDIPITY!
Have a great day, everyone!
————- DON’T MISS A SINGLE POST —————


I laughed and laughed when I read this. Full marks for persevering and I really love your dress.
Author
Kudos to you (and thank you) for reading through, it was a really long post! I’m wearing it right now and I totally love it. I think it’s the most pleasant against my skin fabric I ever used! Plus the swishiness… yum!
This dress is BEAUTIFUL on you! The fabric is such a perfect fit to the pattern – that close up of the hem really shows how lovely it really is. Nothing like a make that you love from top to bottom and love wearing too! 😉
Author
Thank you so much! You are so right! I wore it yesterday and felt absolutely fabulous in it.
Oh my goodness what a journey you went on with this dress! Worth it though! Xx
Author
I don’t think I ever persevered with any garment like I did with this one. I finally wore it to work today and I got so many compliments! I just really enjoyed it, felt so glam! Thank you for commenting!
It’s stunning! You would never guess the palava you went through to get it that way!
Author
Thank you! I definitely feel it was worth! I just love wearing it. Hoping for more warm days in which to take it out!
It sounds as though you had to jump through lots of hoops to get this dress completed, but goodness, it was worth it! You look fabulous in it!
Author
Thank you! I’m so glad I got to wear it yesterday before the weather got bad again!!
Gorgeous dress! Lovely fabric! Style looks good on you!
Author
Thank you! And thank you for stopping by and leaving a comment, here and on pattern review.
You look so lovely in this – it was worth sticking with that hem! I really admire your patience – I think I might have given up!
Author
Oh, believe me, I was so close! But I just liked the dress so much. Thank you for your kind words and stopping by!
Very gorgeous! I really love the dress, especially the sleeves are beautiful:)
Author
Thank you, Eli! I just saw that there is a sale on Mimi G’s website for all patterns from SewSewDef, all PDFs are $5, if you’d like to give it a go.
You’ve ended up with a lovely dress! Your determination is inspiring to all of us who have been through this before and will go through it again probably someday – coincidentally I am right now struggling with my fabric for my dress, or is it going to be a top?
Author
Thank you, Linda! I found that lately I tend to have more patience than I used to and I unpick or redo until I am well and trully happy with a project. Maybe I’m growing older and wiser?
And to think I hate to even have to pick out one seam when I’m sewing. You’re one determined cookie! 🙂 And, the dress is lovely… I may have to go pick this one up. LOVE the hemline!
Author
Ha ha, doesn’t happen very often! I super recommend this pattern btw.